
Who is this Guide For?
- All Users with access to Crexendo VIP Group messaging campaigns
- Users who want to send scheduled follow-ups using Drip Campaigns
What You’ll Accomplish
- Create, edit, and delete Drip Campaigns
- Add scheduled “drips” (messages) with custom time intervals
- Understand what happens when a contact replies during a campaign
Overview
Drip Campaigns allow you to apply a scheduled set of messages to a contact based on intervals of your choosing. Any replies received from the contact will break (stop) any future drips that have not yet been sent.
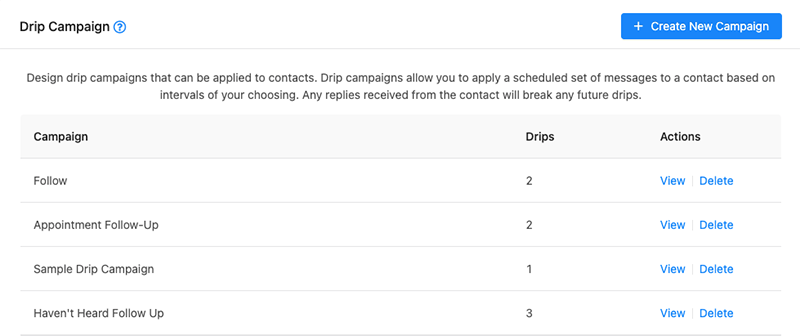
Create or Edit a Drip Campaign
Create a New Drip Campaign
- Click Create New Campaign (top-right of the screen).
- Enter a Campaign Name that clearly identifies the campaign.
- Click Add Drips to add your first message row.
- Type your drip message into the message text area.
- Select the drip interval (calculated from the time the campaign is applied).
- Repeat steps 3–5 to add additional drips.
- Click Save (bottom-right of the drawer) to save your campaign.
Tip: Use a campaign name that makes it easy to recognize the purpose and content later (for example: New Lead Follow-Up, Missed Appointment Sequence, or Post-Purchase Check-In).
Tip: We recommend allowing at least one day between each drip interval to reduce opt-outs and avoid annoying your contact.
Edit an Existing Drip Campaign
- Locate the drip campaign you want to edit in the list.
- Under the Actions column, click View to open the edit drawer.
- Update the campaign name, drips, messages, or intervals as needed.
- Click Save (bottom-right of the drawer) to apply your changes.
How Drip Campaigns Behave When a Contact Replies
Important behavior: If the contact replies at any time after the campaign is applied, any future drips that have not yet been sent will be stopped.
Delete a Drip Campaign
- Locate the drip campaign you want to delete in the list.
- Under the Actions column, click Delete.
- When prompted, click OK to confirm deletion.
Warning: Deleting a drip campaign permanently removes it and its scheduled drips.
Troubleshooting
My future drips stopped sending
- If the contact replied, the system automatically stops any future drips that have not yet been sent.
- Review the conversation history to confirm a reply was received.
- If you still need follow-up messages, create a new campaign or re-apply a campaign if your workflow allows it.
I updated a campaign but nothing changed
- Be sure to click Save at the bottom-right of the edit drawer after making changes.
Contacts are opting out after starting a campaign
- Increase time between drips (recommended: at least one day between messages).
- Review message tone and frequency to ensure the campaign feels helpful, not spammy.
FAQ
What is a drip interval based on?
Intervals are calculated from the time the campaign is applied to the contact.
If a contact replies, do already-sent drips get removed?
No. A reply only stops drips that have not yet been sent.
Need More Help?
If you need additional assistance, please contact Crexendo Support at 855-211-2255 or email us at support@crexendo.com — our team is happy to help!
```