
Who is this Guide For?
- All Users with access to Crexendo Business Marketing Messaging Automations
- Users configuring keyword-based workflows, opt-ins/opt-outs, and forwarding rules
What You’ll Accomplish
- Understand common Automation Actions and what they do
- Configure action settings (lists, replies, forwarding, unsubscribe, webhooks)
- Save and manage actions inside an automation
Overview
Automation Actions are the “do something” steps that run after an automation is triggered (for example, when a contact replies with a keyword). Every automation requires at least one action.
Each action has an Action Name (a label you choose) so you can identify it later when reviewing or editing your automation.

Add an Action to an Automation
- Open the automation you want to edit.
- In the Actions area, choose an action type from the action dropdown.
- Enter an Action Name (a short, descriptive label).
- Complete the required settings for that action (examples below).
- Click Save Action (typically in the bottom-right of the action drawer/panel).
Tip: Use consistent naming so actions are easy to scan later (example: Auto-Reply | HOURS, Forward | After Hours → On-Call, List | Add → VIP).
Automation Action Types and Settings
Below are common actions you can add to your automations, what they do, and how to configure them.
Add to Group (List)
Automatically adds a contact to a selected Contact List when the automation triggers. This is commonly used for opt-ins and list-building.
Common use cases:
- Keyword opt-in (example: text “JOIN” to subscribe)
- Segment contacts by interest (example: “PRICING”, “EVENTS”, “VIP”)
- Build a list for future Blasts
Settings to configure:
- Action Name
- Select List/Group to add the contact to
Note: The contact list must already exist before you can add contacts to it through an automation.

Remove from Group (List)
Automatically removes the contact from a selected list when the automation triggers (only applies if the contact is already in that list).
Common use cases:
- Keyword-based removal (example: “PAUSE”, “CANCEL”, “REMOVE”)
- Move contacts between segments (remove from one list before adding to another)
Settings to configure:
- Action Name
- Select List/Group to remove the contact from

Send SMS Reply
Automatically sends a reply back to the contact who triggered the automation. This is ideal for confirmations, FAQs, and acknowledgement messages.
Common use cases:
- Confirm opt-in (“You’re subscribed!”)
- Provide information (“Our hours are…” / “Here’s our address…”)
- Set expectations (“We received your message and will respond within…”)
Settings to configure:
- Action Name
- Message Content (the exact reply that will be sent)
Tip: Keep replies short and helpful. If you include a link, avoid URL shorteners when possible.

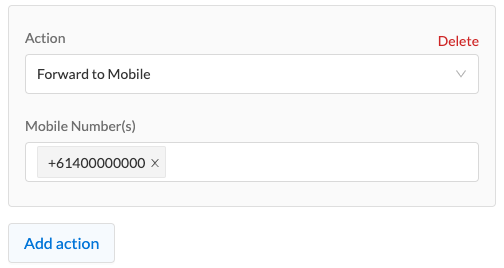
Forward to Mobile
Automatically forwards inbound responses that trigger the automation to one or more mobile numbers. This is helpful for on-call staff, managers, or teams that need real-time visibility.
Common use cases:
- After-hours escalation to an on-call phone
- Forward “urgent” keyword responses
- Notify a field team while away from the web portal
Settings to configure:
- Action Name
- Mobile Number(s) to forward to
Tip: Add conditions (keywords, time windows, or receiving number) to prevent forwarding every message.
Forward to Email
Automatically forwards inbound responses that trigger the automation to one or more email addresses. This is useful for shared inbox workflows, archiving, and basic triage.
Common use cases:
- Route responses into a shared support inbox
- Store responses in email folders for organization
- Notify internal teams (billing, scheduling, operations)
Settings to configure:
- Action Name
- Email Address(es) to forward to

Unsubscribe
Automatically unsubscribes a contact when the automation triggers (commonly used for opt-out keywords). Once unsubscribed, the contact should no longer receive marketing messages.
Common use cases:
- Support additional opt-out keywords (beyond standard STOP handling)
- Apply opt-out logic to a specific campaign/workflow
Settings to configure:
- Action Name
- Opt-out trigger text is typically handled by the automation’s conditions/settings (keyword matching)
Tip: Pair this action with a Send SMS Reply action to confirm the opt-out (example: “You have been unsubscribed.”).

Forward to URL (Webhook / REST Integration)
Sends automation event data to a third-party system using a webhook-style request. This is commonly used to create or update records in other platforms (CRM, ticketing, forms, internal tools).
Common use cases:
- Create a lead or support ticket when a keyword is received
- Trigger an internal workflow (e.g., notify an ops tool)
- Log responses to a database for reporting
Settings to configure:
- Action Name
- HTTP Method (example: GET / POST / PUT)
- Endpoint URL (the destination your system provides)
- Headers (optional; commonly used for authorization tokens)
- Parameters (optional; key/value pairs sent with the request)
Tip: If your endpoint requires authentication, confirm the correct header format (for example, a Bearer token) and test the endpoint before enabling the automation.

Troubleshooting
My action isn’t being applied
- Confirm you clicked Save Action after configuring the action.
- Verify the automation is enabled/active (if your system supports an enable toggle).
- Check that your automation’s conditions are being met (keywords, message type, time windows, etc.).
Add to Group / Remove from Group doesn’t work
- Make sure the target Contact List already exists.
- Confirm you selected the correct list in the action settings.
- If removing, verify the contact is already in that list.
Forward to URL fails or doesn’t reach my system
- Verify the endpoint URL is correct (including https:// if required).
- Confirm the correct HTTP Method is selected.
- If authentication is required, verify header key/value formatting.
- Check whether your endpoint expects parameters in the query string vs. request body.
FAQ
Do I need at least one action in every automation?
Yes. Automations require at least one action to perform a task after the trigger/conditions are met.
Can I use multiple actions in one automation?
Yes. A common pattern is Add to Group + Send SMS Reply (opt-in confirmation), or Forward + Auto-Reply (acknowledge + route internally).
What’s the best way to name actions?
Use descriptive names that include the purpose and destination (example: Forward → Billing Email, Auto-Reply → HOURS, Add → VIP List).
Need More Help?
If you need additional assistance, please contact Crexendo Support at 855-211-2255 or email us at support@crexendo.com — our team is happy to help!